
Instructional Agents
CLIAI agents collaborate via the ADDIE instructional design model: enter a course name to get a syllabus, LaTeX slides, lecture scripts and assessments, convertible to editable PPTX. Open-source code for an EACL 2026 paper; needs an OpenAI API key, LaTeX for PDFs and Node.js for PPTX.
Instructional Agents: Reducing Teaching Faculty Workload through Multi-Agent Instructional Design





Claude Code · Quick Start · Core Modules · FAQ
An AI-powered instructional design system based on the ADDIE model for automated course creation and evaluation.
@misc{yao2025instructionalagentsllmagents,
  title={Instructional Agents: Reducing Teaching Faculty Workload through Multi-Agent Instructional Design},
  author={Yao, Huaiyuan and Xu, Wanpeng and Turnau, Justin and Kellam, Nadia and Wei, Hua},
  year={2025},
  eprint={2508.19611},
  archivePrefix={arXiv},
  primaryClass={cs.AI},
  url={https://arxiv.org/abs/2508.19611},
}
📰 News
[2026.1.6] Instructional Agents is accepted by EACL 2026 Main Conference!
📦 Releases
[2026.4.15] Released Claude Code Skills - invoke the pipeline directly from Claude Code:
/plugin install DaRL-GenAI/instructional_agents-skills[2026.4.13] Release v1.1.0 - Added LaTeX-to-PPTX conversion with pptxgenjs, Slide Masters, react-icons, and shadow effects
[2026.3.26] Published on PyPI -
pip install instructional-agents
History releases
[2026.1.6] v1.0.0 - Initial release with core features - Thanks to all the contributors! ❤️
[2026.1.4] v0.1.0 - Docker deployment and web interface support
✨ Features
| Feature | Description |
|---|---|
| 🤖 Multi-Agent Collaboration | Multiple specialized LLM agents working together based on ADDIE instructional design model |
| 📚 Automated Course Generation | Generate complete course materials including syllabus, slides, scripts, and assessments |
| 🎯 Catalog Mode | Use structured catalog files to guide course generation with student profiles and institutional requirements |
| 🤝 Copilot Mode | Interactive mode for providing feedback during generation at each ADDIE phase |
| 📊 Real-time Progress | Monitor generation progress with real-time logs, progress bars, and file updates |
| 🌐 Web Interface | User-friendly web interface for course generation, progress monitoring, and file management |
| 📁 Multiple Usage Methods | Support for web interface, command-line, and RESTful API |
| 📄 LaTeX/PDF Output | Generate professional LaTeX slides and compile to PDF format |
| 🎨 PowerPoint (PPTX) Export | Convert LaTeX Beamer slides to visually rich PPTX using pptxgenjs with icons, shadows, and Slide Masters |
| ✅ Automatic Evaluation | Built-in evaluation system for assessing generated course materials |
🎬 How It Works
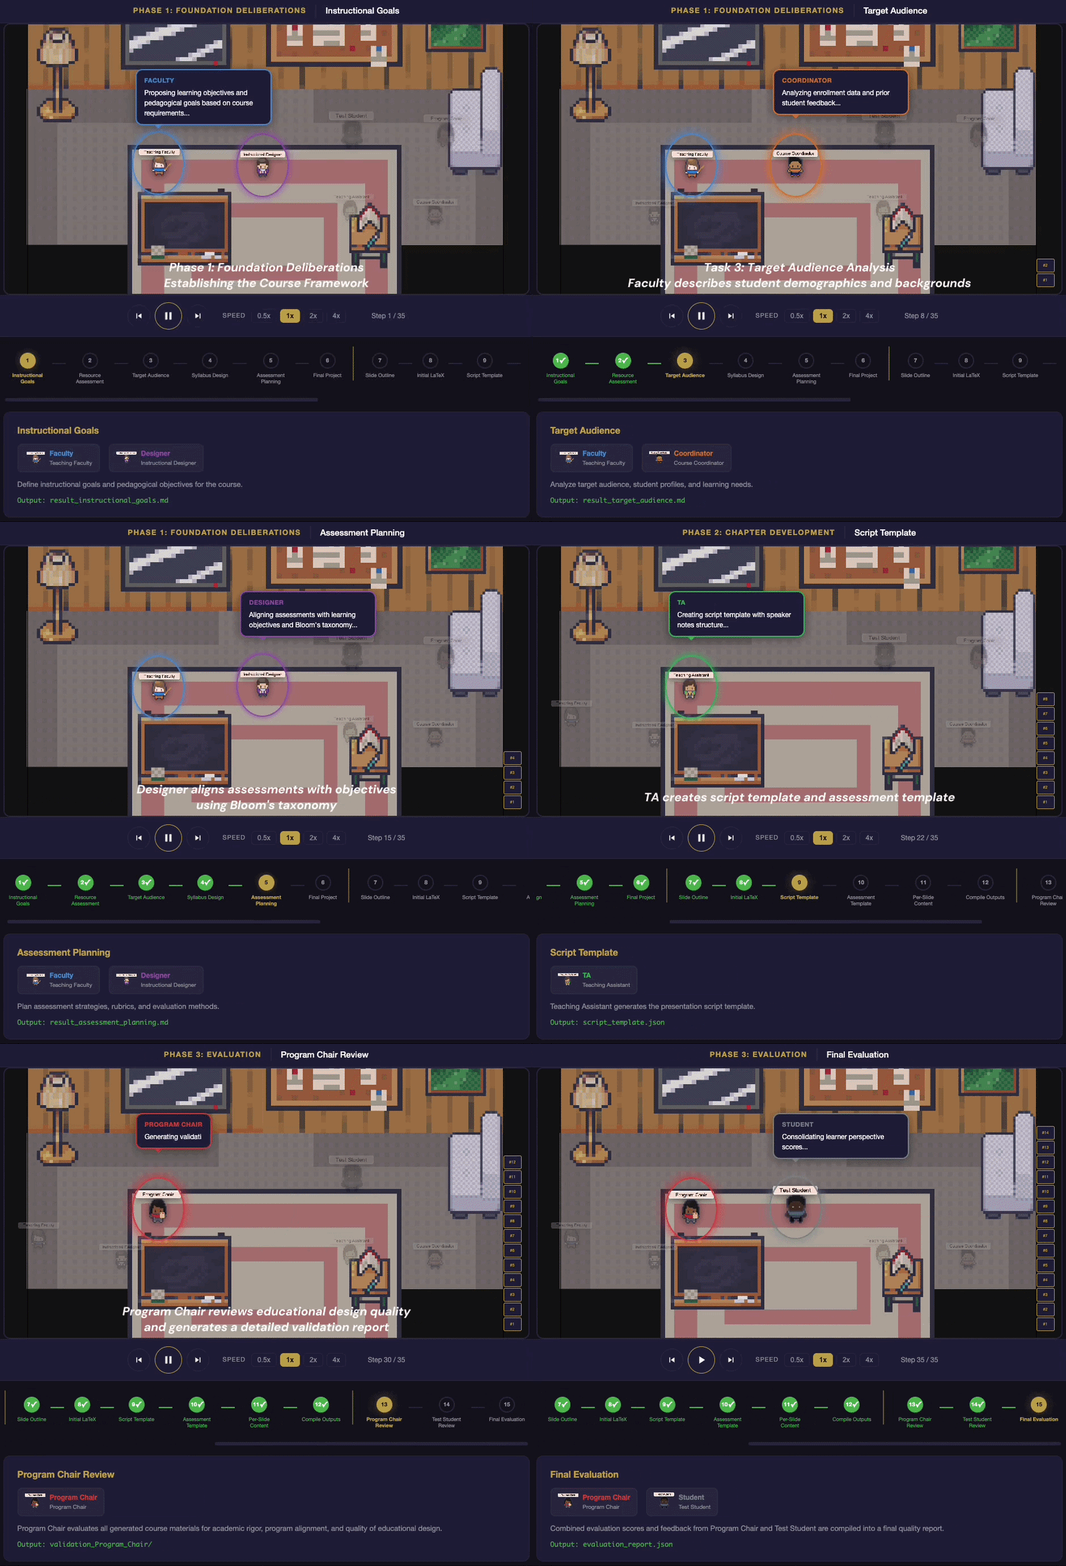
🤖 Use via Claude Code
Invoke the full ADDIE pipeline and related tools directly from Claude Code — no Python boilerplate.
pip install instructional-agents
/plugin install DaRL-GenAI/instructional_agents-skills
Then ask Claude in natural language: "Generate a course on Reinforcement Learning", "Convert this Beamer .tex to an editable .pptx", "Evaluate these slides as a Program Chair". See the skills repo for all available commands.
🚀 Quick Start (Docker - Recommended)
This guide will walk you through the complete workflow from setup to viewing results.
Step 1: Environment Setup
1.1 Prerequisites
- Docker and Docker Compose installed
- Check installation:
docker --versionanddocker-compose --version - Install: Docker Desktop
- Check installation:
- OpenAI API Key
- Get one from: https://platform.openai.com/api-keys
1.2 Configuration
# Clone the repository (if not already done)
git clone <repository-url>
cd instructional_agents

# Create environment variables file
cp .env.example .env

# Edit .env file and add your OPENAI_API_KEY
# OPENAI_API_KEY=your_api_key_here
# API_PORT=8000
Note: You can also configure the API key directly in the web interface (see Step 2.2). If you skip setting it in
.env, you'll need to enter it in the frontend.
1.3 Start Docker Service
# Option 1: Use the start script (recommended)
./start.sh

# Option 2: Start manually
docker-compose up -d

# Verify service is running
curl http://localhost:8000/health
# Should return: {"status":"healthy","version":"1.0.0",...}
Tip: If port 8000 is already in use, modify
API_PORTin your.envfile.
Step 2: Access Web Interface
2.1 Open the Frontend
Option A: Direct file access (simplest)
# Open frontend/index.html directly in your browser
open frontend/index.html  # macOS
# or double-click frontend/index.html in your file manager
Option B: Local server (recommended for better CORS support)
# Using Python
cd frontend
python -m http.server 8080
# Then open http://localhost:8080/index.html in your browser
2.2 Configure API Key
- In the web interface, locate the "API Configuration" section at the top
- Enter your OpenAI API Key in the input field
- Click "Save API Key" to save it (stored locally in your browser)
- The status indicator will show "✅ API Key Configured" when successful
Note: Your API key is only stored in your browser's local storage and never sent to any server except OpenAI during course generation.
2.3 Submit a Course Generation Task
-
Fill in the course configuration form:
- Course Name (required): e.g., "Introduction to Machine Learning"
- Model Selection: Choose from GPT-4o Mini (recommended), GPT-4o, or GPT-4 Turbo
- Experiment Name: Leave as "default" or specify a custom name
- Copilot Mode: Enable for interactive feedback during generation (optional)
- Catalog Mode:
- Select "Not Use" for basic generation
- Select "Upload Catalog File" to upload a custom catalog JSON
- Select "Use Default Catalog" to use the default catalog
-
Click "Generate Course" to start the task
-
To look at the Generation Procedure on the following, please go to Step 3 and 4:
- Progress bar showing completion percentage
- Current stage information
- Real-time logs stream
Step 3: Monitor Progress and Logs
If you need to view logs outside the web interface:
# View container logs in real-time
docker-compose logs -f api

# View last 100 lines
docker-compose logs --tail=100 api

# View logs for a specific time range
docker-compose logs --since 30m api
Step 4: View Generated Results
4.1 Via Web Interface (Recommended)
Once generation starts, the "Generation Results" section will appear showing:
-
File Location:
- Displays the local path where files are saved
- Example:
/Users/your_username/PycharmProjects/instructional_agents/exp/your_experiment_name/ - Quick actions:
- 📋 Copy Path: Copy the path to clipboard
- 📂 Open Directory: Open the directory in Finder/Explorer
-
File List (updates incrementally):
- Files appear as they are generated (no need to wait for completion)
- Each file shows:
- File icon based on type (📝 .md, 📄 .tex, 📕 .pdf, 📋 .json)
- File name and size
- 🆕 New badge for newly generated files
- 📥 Download button for immediate download
-
File Organization:
- Files are grouped by directory
- Foundation files (syllabus, goals, etc.) in the root
- Chapter materials in
chapter_1/,chapter_2/, etc.
4.2 Via File System
Generated files are saved in the exp/ directory in your project folder:
# List all experiments
ls exp/

# View a specific experiment's structure
ls -R exp/your_experiment_name/

# Open in Finder (macOS)
open exp/your_experiment_name/

# Open in Explorer (Windows)
explorer exp\\your_experiment_name\\

# View course syllabus
cat exp/your_experiment_name/result_syllabus_design.md

# View generated slides PDF
open exp/your_experiment_name/chapter_1/slides.pdf
File Structure:
exp/{experiment_name}/
├── result_instructional_goals.md          # Learning objectives
├── result_resource_assessment.md          # Resource assessment
├── result_target_audience.md              # Target audience analysis
├── result_syllabus_design.md              # Course syllabus (⭐ important)
├── result_assessment_planning.md          # Assessment planning
├── result_final_exam_project.md           # Final project design
├── result_presentation_design.md          # Seventh foundation: course-wide presentation design
├── processed_chapters.json                # Chapter metadata
├── course_slide_style.json                # Validated course-wide frontend style
├── course_slide_style_source.md           # Exact selected style source snapshot
├── statistics_slide_style.json            # Style deliberation timing/tokens
├── statistics.json                        # Generation statistics
│
├── chapter_1/                             # Chapter 1 materials
│   ├── slides.tex                         # LaTeX source
│   ├── slides.pdf                         # Compiled PDF slides (⭐ ready to use)
│   ├── html/                              # Portable offline HTML bundle
│   │   ├── slides.html                    # Offline interactive HTML slides
│   │   └── assets/                        # Offline MathJax and selected fonts
│   ├── slides-html.pdf                    # PDF exported from the HTML deck
│   ├── slides-html.pptx                   # Static image-based HTML export
│   ├── frontend-slides-manifest.json      # Hashes, counts, warnings, artifacts
│   ├── slides.pptx                        # PowerPoint slides (⭐ editable)
│   ├── script.md                          # Presentation script
│   ├── assessment.md                      # Assessment materials
│   └── statistics_slides_chapter_1.json   # Chapter statistics
│
├── chapter_2/                             # Chapter 2 materials
│   └── ...
└── ...
Tip: Files are generated incrementally. You can download or view them as soon as they appear, without waiting for the entire generation to complete.
Each generated script.md is validated one-to-one against the rendered HTML
slides. Press N in html/slides.html to toggle the offline presenter-notes
panel; the panel is excluded from static PDF and PPTX exports.
For detailed file descriptions, see Generated Files Guide.
Step 5: Next Steps
See Documentation section below for detailed guides and references.
📦 Install via PyPI
pip install instructional-agents
After installation, you can run the CLI directly:
# Set your OpenAI API key
export OPENAI_API_KEY=your_api_key_here

# Generate a course
instructional-agents "Introduction to Machine Learning"
🔧 Local Development Setup
For developers who want to run the system locally from source:
1. Prerequisites
- Python 3.11+
- pip
- LaTeX (for PDF generation)
- macOS:
brew install --cask mactex - Ubuntu:
sudo apt-get install texlive-full - Windows: Install MiKTeX
- macOS:
- Node.js 18+ (for PPTX generation)
- macOS:
brew install node - Ubuntu:
sudo apt-get install nodejs npm - Windows: Install from nodejs.org
- macOS:
2. Install Dependencies
# Python dependencies
pip install -r requirements.txt

# Or install in editable mode
pip install -e .

# Node.js dependencies (for PPTX generation)
npm install -g pptxgenjs

# Optional: install react-icons for slide icons (recommended)
npm install -g react-icons react react-dom sharp
Note:
pptxgenjsis required for LaTeX-to-PPTX conversion. Thereact-icons+sharppackages are optional but recommended — they add topic-specific icons to each slide (e.g., 🤖 for agent topics, 🧠 for AI topics). Without them, slides will use simple geometric shapes instead.
3. Configuration
Option A: Using config.json
{
  "OPENAI_API_KEY": "your_openai_api_key_here"
}
Option B: Using environment variable
export OPENAI_API_KEY=your_api_key_here
4. Start API Server
# Start the API server
python api_server.py

# Or use uvicorn directly with auto-reload
uvicorn api_server:app --host 0.0.0.0 --port 8000 --reload
The API will be available at http://localhost:8000
- API Documentation: http://localhost:8000/docs
- Health Check: http://localhost:8000/health
🚀 Usage Methods
Method 1: Web Interface (Recommended)
The easiest way to use the system. See Step 2 above for detailed instructions.
Features:
- 📝 Visual course configuration form
- 📊 Real-time progress monitoring
- 📁 Result file browsing and download
- 📤 Catalog file upload and management
- 🔄 Real-time log streaming
Method 2: Command Line
Entry Point: run.py – Main workflow entry point
# Simple course generation
python run.py "Introduction to Machine Learning"

# With specific model
python run.py "Data Structures" --model gpt-4o-mini

# With experiment name
python run.py "Web Development" --exp web_dev_v1

# Interactive copilot mode
python run.py "Database Systems" --copilot

# Use catalog mode
python run.py "Software Engineering" --catalog

# Use specific catalog file
python run.py "AI Fundamentals" --catalog ai_catalog

# Combine catalog and copilot
python run.py "Educational Psychology" --copilot --catalog edu_psy

# Enable images with no numeric per-chapter cap
python run.py "Systems Thinking" --image-generation on --image-count on

# Opt in to Carbon-rendered code images
python run.py "Programming Languages" --code-images on
Minimal Working Example (generates a small 3-week course in ~5 min):
python run.py "Intro to Python" --catalog mwe_catalog --exp mwe_test --seed 42
Command Line Arguments:
python run.py <course_name> [OPTIONS]

Required:
  course_name              Name of the course to design

Options:
  --copilot                Enable interactive copilot mode
  --catalog [name]         Use structured data from catalog/ directory
                           (optional: specify catalog name without '.json')
  --model MODEL            OpenAI model to use (default: gpt-4o-mini)
  --exp EXP_NAME           Experiment name for saving output (default: exp1)
  --seed SEED              Random seed for reproducibility
  --temperature TEMP       Sampling temperature for LLM
  --image-generation {on,off,replace}
                           Enable, disable, or replace generated slide images
  --image-count {on,off}   Turn AI-selected image counts on or off; when on,
                           the count is always automatic
  --code-images {on,off}   Use Carbon code images or styled HTML code blocks
  --optimize STORAGE_ID    Optimize mode: provide storage_id of uploaded PDFs
  --requirements TEXT      User requirements for optimization (with --optimize)
  --chapter NAME           Specific chapter to optimize (with --optimize)
Dynamic slide images are off by default. When enabled, the presentation-design
deliberation may still veto imagery. Use --image-count on to remove the fixed
numeric budget and always let the placement AI choose the count. Use
--image-count off to restore the experiment's stored fixed cap (3 by default).
Omitting the flag preserves the current experiment setting. The placement AI
may choose zero, five, six, or any other number up to the chapter's eligible
slides while automatic counting is on.
Generated images appear only in the HTML, HTML-derived PDF, and HTML-derived
PPTX; the Beamer source and PDF are unchanged. See
docs/BETTER_SLIDES_GENERATION.md
for cache and replacement behavior.
Carbon code images are also off by default. --code-images on persists the
choice in course_code_images.json and applies it to every chapter. The first
enabled chapter that actually contains a lstlisting or verbatim block uses
an existing carbon-now executable or runs
npm install --global carbon-now-cli@2.1.0. This is an explicit global npm
installation; Node.js and npm must already be installed and are never installed
automatically. Missing prerequisites, installation failures, network failures,
timeouts, or invalid Carbon output produce warnings and retain the styled
editable <pre> block. Successful PNGs are cached by content, language, theme,
pipeline, and Carbon version, then embedded directly in the self-contained
HTML. They therefore appear in the HTML-derived PDF and PPTX, while
slides.tex and the Beamer PDF remain unchanged. Use --code-images off to
persistently return the course to <pre> rendering.
Method 3: Direct API Calls
API Server: api_server.py – RESTful API service
# Start API server first (if not using Docker)
python api_server.py

# Generate a course
curl -X POST http://localhost:8000/api/course/generate \
  -H "Content-Type: application/json" \
  -H "X-OpenAI-API-Key: your_api_key_here" \
  -d '{
    "course_name": "Introduction to Machine Learning",
    "model_name": "gpt-4o-mini",
    "exp_name": "ml_intro_v1"
  }'

# Check task status
curl http://localhost:8000/api/course/status/{task_id}

# Get result files
curl http://localhost:8000/api/course/results/{task_id}/files

# Download a file
curl http://localhost:8000/api/course/results/{task_id}/download/chapter_1/slides.pdf \
  --output slides.pdf
For complete API documentation, see API Documentation.
🔧 Core Modules
| Module | Description | Usage |
|---|---|---|
| Course Generation | Generate complete course materials based on ADDIE model | Web interface, CLI (run.py), or RESTful API |
| Catalog Mode | Use structured catalog files for guided generation | --catalog flag or upload in web interface |
| Copilot Mode | Interactive feedback during generation | --copilot flag in CLI or enable in web interface |
| Evaluation | Automatic assessment of generated materials | python evaluate.py --exp <exp_name> |
| Web Interface | Visual interface for course generation | Open frontend/index.html in browser |
| API Server | RESTful API for programmatic access | python api_server.py or Docker |
📚 Advanced Usage
Catalog Mode
Catalog files provide structured input data to guide the course generation process. They include:
- Student profiles and backgrounds
- Instructor preferences and teaching style
- Optional presentation style preferences, including visual direction, colors, typography, layout density, accessibility needs, and styles to avoid
- Course structure requirements
- Assessment design preferences
- Teaching constraints
- Institutional requirements
Using Catalogs:
# Use default catalog
python run.py "Software Engineering" --catalog

# Use a specific catalog file (without .json extension)
python run.py "AI Fundamentals" --catalog ai_catalog
# System looks for: catalog/ai_catalog.json

# Upload catalog via web interface
# In the web interface, select "上传 Catalog 文件" and upload your JSON file
See API Documentation for catalog format details.
presentation_style_preferences is advisory. The presentation-design agents
consider every non-empty preference when comparing packaged styles, while
accessibility, readability, course suitability, and rendering feasibility take
priority when a preference conflicts with the available designs. The selected
style remains frozen on resume; use a new experiment or
--reselect-presentation-design with run.py to apply changed
preferences.
Copilot Mode
Interactive mode that prompts for feedback after each phase of the ADDIE workflow:
- Analysis phase: Review and provide feedback on learning goals, resource assessment, target audience
- Design phase: Review and refine syllabus design, assessment planning, final project
- Development phase: Review and adjust chapter materials as they're generated
python run.py "Advanced Algorithms" --copilot --exp algo_course_v2
Automatic Evaluation
Entry Point: evaluate.py – Automatic assessment and scoring
# Evaluate a specific experiment
python evaluate.py --exp web_dev_v1
Evaluation results are saved in eval/{experiment_name}/ directory.
LaTeX-to-PPTX Conversion
Convert generated LaTeX Beamer slides to editable PowerPoint presentations with professional design:
# Convert a single chapter
python -c "
from src.latex_to_pptx import LaTeXToPPTXConverter
converter = LaTeXToPPTXConverter()
converter.convert('exp/my_course/chapter_1/slides.tex', 'exp/my_course/chapter_1/slides.pptx')
"

# Convert all chapters in a course
python -c "
from src.latex_to_pptx import LaTeXToPPTXConverter
converter = LaTeXToPPTXConverter()
converter.convert_directory('exp/my_course/')
"
PPTX Design Features:
- 🎨 Midnight Executive palette — navy/ice-blue/orange color scheme with Georgia/Calibri fonts
- 📐 Slide Masters — consistent layouts via
CONTENT_MASTER,CONTENT_CODE, andDARK_MASTER - 🌓 Dark/light sandwich — dark slides for title/conclusion, light for content
- 🔤 Smart icons — topic-aware icons from react-icons (robot, brain, code, etc.) in colored circles
- 🎭 Varied layouts — auto-detected: single-text, list-only, blocks, code, columns, mixed
- 💫 Visual polish — shadows on blocks/code, sidebar accent motif, decorative circles
- 📏 Typography — 36pt+ titles, 14-16pt body, auto-scaling for long titles
Architecture: LaTeX .tex → [Python LaTeXParser] → JSON → [Node.js pptxgenjs] → .pptx
Background Execution with Logging
For long-running tasks, run in the background:
# Run in background with log file
nohup python run.py "Advanced Machine Learning" --exp ml_advanced > logs/ml_course.log 2>&1 &

# Monitor progress
tail -f logs/ml_course.log

# Check process status
ps aux | grep "python run.py"
📚 Example Workflows
Complete Course Design
# Step 1: Generate course using catalog
python run.py "Python Fundamentals" \
  --catalog python_catalog \
  --model gpt-4o \
  --exp py_course_v1

# Step 2: Evaluate results
python evaluate.py --exp py_course_v1

# Step 3: Review generated materials
open exp/py_course_v1/result_syllabus_design.md
open exp/py_course_v1/chapter_1/slides.pdf
Interactive Development (Copilot)
python run.py "Advanced Algorithms" --copilot --exp algo_course_v2

# You'll be prompted for feedback after each phase:
# - Analysis → feedback on goals, resources, audience
# - Design → feedback on syllabus, assessments
# - Development → feedback on chapter materials
📖 Documentation
| API Documentation | Docker Deployment | Generated Files Guide |
|---|---|---|
| Complete API reference and endpoints | Docker setup and deployment guide | Detailed description of generated files |
| Workflow Documentation | Development Guide | |
|---|---|---|
| System workflow and agent collaboration details | Development and debugging documentation |
❓ FAQ
How to configure API key?
Checklist
- Get OpenAI API key from https://platform.openai.com/api-keys
- Configure in
.envfile or web interface
Solutions
- Option 1: Set in
.envfile:OPENAI_API_KEY=your_key_here - Option 2: Configure in web interface (stored in browser local storage only)
Port 8000 already in use?
Problem
Starting the service shows "port already in use" error.
Solution
# macOS/Linux: Find and kill the process
lsof -i :8000
kill -9 <PID>

# Or change port in .env file
API_PORT=8001
How to use catalog files?
Checklist
- Catalog files should be in JSON format
- Place catalog files in
catalog/directory
Solutions
- Default catalog: Use
--catalogwithout value to usecatalog/default_catalog.json - Custom catalog: Use
--catalog my_catalogto usecatalog/my_catalog.json - Web interface: Upload catalog file directly in the web interface
Where are generated files saved?
Answer
Generated files are saved in exp/{experiment_name}/ directory:
- Foundation files (syllabus, goals, etc.) in the root
- Chapter materials in
chapter_1/,chapter_2/, etc. - Files are generated incrementally and can be downloaded as soon as they appear
Web interface cannot connect to backend?
Checklist
- Confirm backend is running (visit http://localhost:8000/docs or http://localhost:8000/health)
- Check browser console for error messages
- Verify API address configuration
Solution
- Docker: Ensure Docker container is running:
docker-compose ps - Local: Ensure API server is running:
python api_server.py - Check that the port matches (default: 8000)
What models are supported?
Answer
Currently supports OpenAI models:
- GPT-4o Mini (recommended, cost-effective)
- GPT-4o
- GPT-4 Turbo
Configure via model selection in web interface or --model flag in CLI.
📜 License
Instructional Agents is released under the MIT License.
Third-party attribution
The HTML slide style-selection assets in assets/slide_gen/skill
are adapted from Frontend Slides
by Zara Zhang. Frontend Slides is used under the MIT License; its original
copyright notice and license terms are preserved in
assets/slide_gen/skill/LICENSE.
関連リソース

Codex PPT Skill
SkillTurns articles, reports, papers or notes into a .pptx of full-slide images with speaker notes, in 12 styles such as lectures and thesis defenses; slide text is not editable. Needs Python 3; uses Codex's built-in image generation, or an OpenAI-compatible image API key in Claude Code.
ningzimu/codex-ppt-skill7k
MulmoCast CLI
CLIWrite a script, speakers and visuals in MulmoScript (JSON or YAML) and the mulmo command generates narration and images and assembles a video, podcast, slide deck or PDF, for explainer videos. Needs Node.js, FFmpeg and an OpenAI API key; other providers optional.
receptron/mulmocast-cli475
Manim
CLIEngine for math and explainer animations in Python (Community Edition, ManimCE): write scenes and render them to video with the manim command, letting agents create teaching and science animations. On macOS install cairo and pkg-config first; formulas need LaTeX.
ManimCommunity/manim41.6k
notebooklm-py
CLIUnofficial Python library and CLI for driving Google NotebookLM (now Gemini Notebook): bulk-import sources, ask cited questions, and generate and download podcasts, videos, slides, quizzes and flashcards. Ships an agent skill. Relies on undocumented APIs and needs a Google sign-in.
teng-lin/notebooklm-py19.8k
Podcastfy
CLIOpen-source alternative to NotebookLM's podcast feature: turns web pages, PDFs, images, YouTube videos or text into two-host conversational audio, useful for lecture notes or articles. Uses Gemini and OpenAI API keys by default, or local models plus free Edge TTS.
souzatharsis/podcastfy6.6k
Gemini Notebook (NotebookLM) CLI & MCP Server
CLIUnofficial nlm CLI and MCP server for NotebookLM (now Gemini Notebook): bulk-create notebooks, import web pages and docs, and generate audio overviews, quizzes, flashcards, mind maps and slides for teaching and study. Relies on undocumented APIs and a Google sign-in, so it may break.
jacob-bd/gemini-notebook-mcp-cli6.3k