
xurl
CLIX(原 Twitter)官方的 API 命令行工具。完成授权后,agent 可以替你发帖、上传图片和视频、查询帖子与账号数据,也能作为 MCP 服务接入 Claude。需要 X 开发者账号并创建应用;X API 按用量付费,要先购买额度。
xurl - A curl-like CLI Tool for the X API
A command-line tool for interacting with the X (formerly Twitter) API, supporting both OAuth 1.0a and OAuth 2.0 authentication.
Features
- Multi-app support — register multiple X API apps with separate credentials and tokens
- OAuth 2.0 PKCE flow authentication
- OAuth 1.0a authentication
- Multiple OAuth 2.0 account support per app
- Default app and default user selection (interactive Bubble Tea picker or single command)
- Persistent token storage in YAML (
~/.xurl/auth.yml), auto-migrates from the legacy single-file layout - HTTP request customization (headers, methods, body)
- Per-request app override with
--app - End-to-end encrypted XChat client (
xurl chat) built on the official chat-xdk crypto library
Installation
Homebrew (macOS)
brew install --cask xdevplatform/tap/xurl
npm
npm install -g @xdevplatform/xurl
Shell script (no sudo required)
curl -fsSL https://raw.githubusercontent.com/xdevplatform/xurl/main/install.sh | bash
Installs to ~/.local/bin. If it's not in your PATH, the script will tell you what to add.
Go
go install github.com/xdevplatform/xurl@latest
Usage
Authentication
You must have a developer account and app to use this tool.
Register an app
Register your X API app credentials so they're stored in ~/.xurl/auth.yml (no env vars needed after this):
xurl auth apps add my-app --client-id YOUR_CLIENT_ID --client-secret YOUR_CLIENT_SECRET
If you want the app to keep its own callback configuration in ~/.xurl/auth.yml, you can store the redirect URI there too:
xurl auth apps add my-app --client-id YOUR_CLIENT_ID --client-secret YOUR_CLIENT_SECRET --redirect-uri http://localhost:8080/callback
You can register multiple apps:
xurl auth apps add prod-app --client-id PROD_ID --client-secret PROD_SECRET
xurl auth apps add dev-app  --client-id DEV_ID  --client-secret DEV_SECRET
Legacy / env-var flow: You can also set
CLIENT_IDandCLIENT_SECRETas environment variables. They'll be auto-saved into the active app on first use.
REDIRECT_URInow resolves in this order:REDIRECT_URIenvironment variable, then the app's storedredirect_uriin~/.xurl/auth.yml, then the built-in defaulthttp://localhost:8080/callback.
OAuth 2.0 User-Context
Note: For OAuth 2.0 authentication, you must specify the redirect URI in the X Developer Console.
- Create an app in the X Developer Console.
- In the console, go to
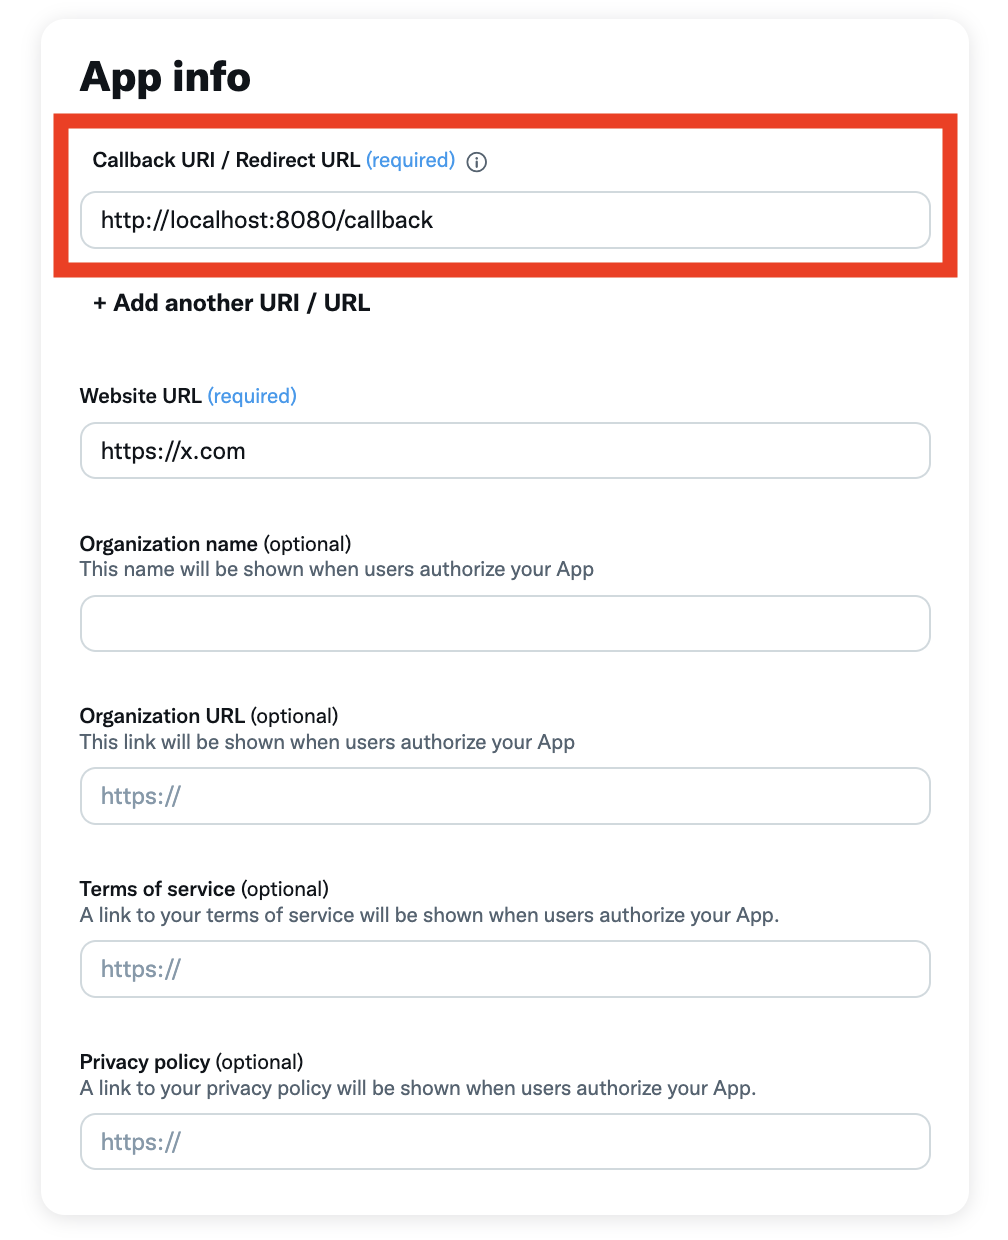
Apps, open your app, and on theKeys & Tokenstab clickSet upnext toUser authentication settings. If the app is already set up, use theSettingsbutton on the app page. UnderApp info, setCallback URI / Redirect URLto the same value thatxurlwill use throughREDIRECT_URI. The default ishttp://localhost:8080/callback, andxurlderives the callback host, port, and path from the effective redirect URI. The effective value is resolved fromREDIRECT_URI, then the app's storedredirect_uri, then the built-in default. When you uselocalhost,xurllistens on both127.0.0.1and::1so browser loopback resolution does not break the callback.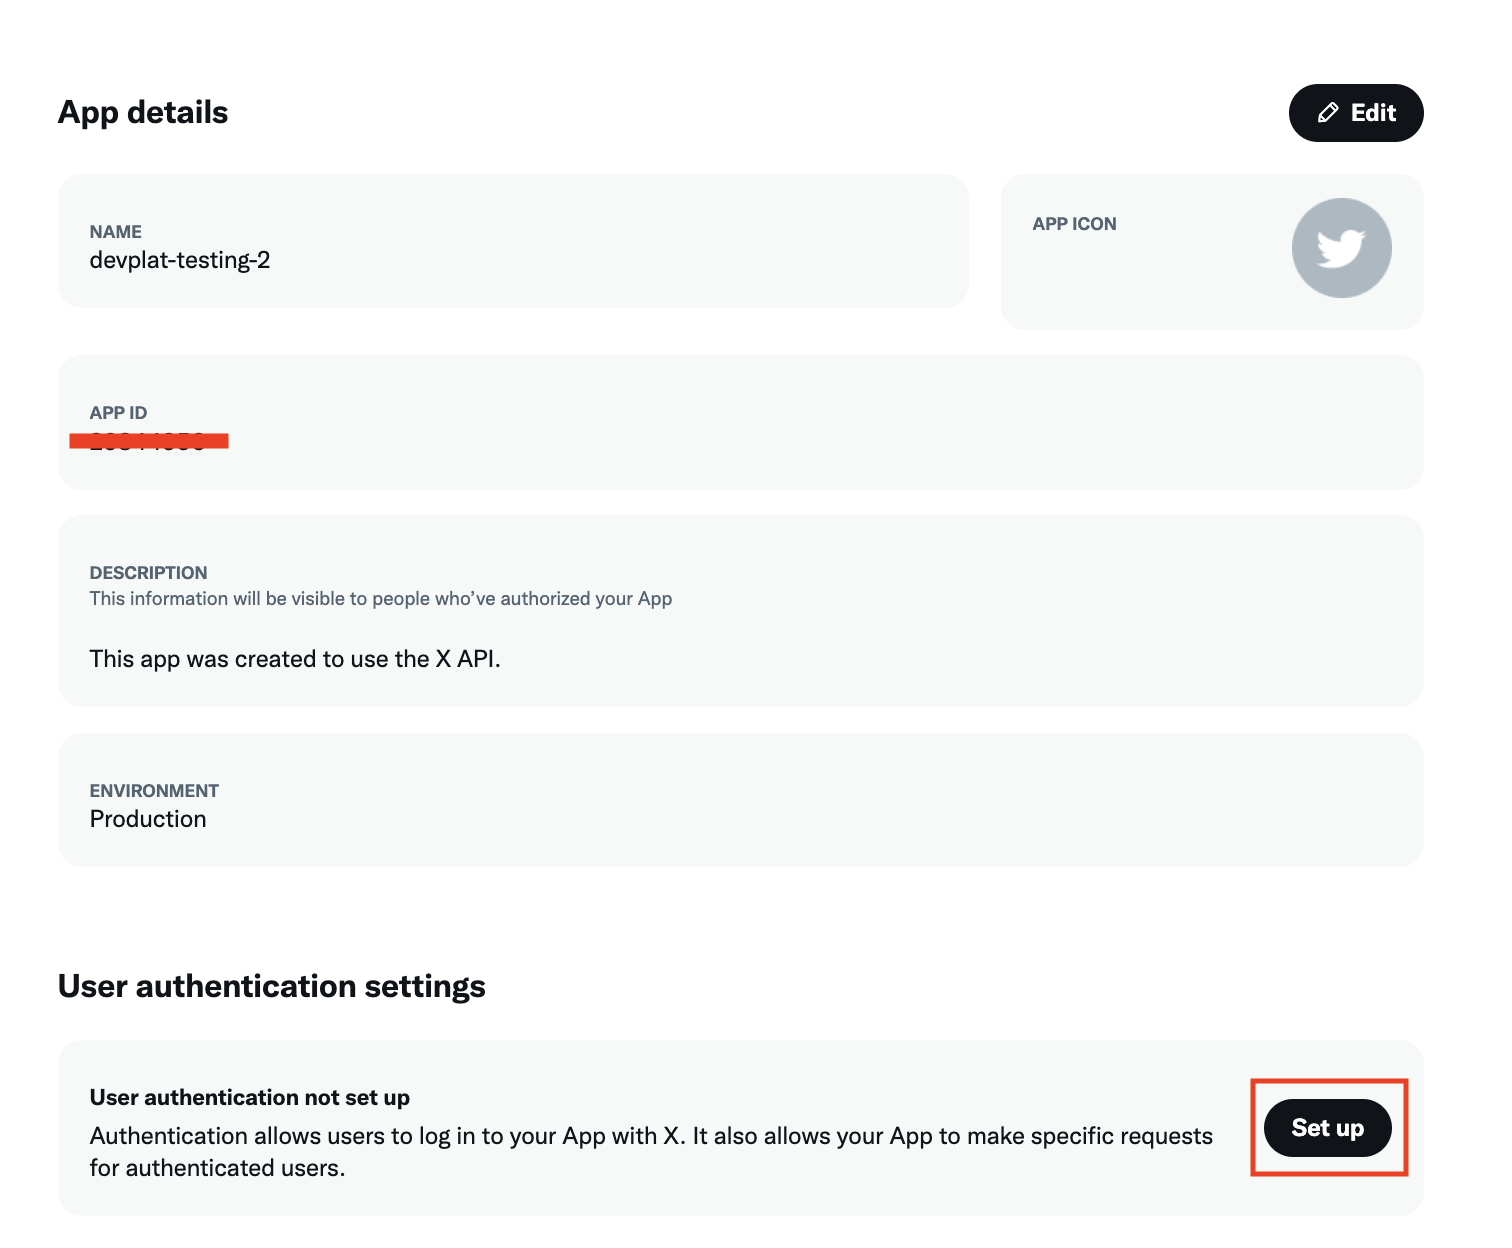
- Register the app (if you haven't already):
xurl auth apps add my-app --client-id YOUR_CLIENT_ID --client-secret YOUR_CLIENT_SECRET
- Get your access keys for the registered app:
xurl auth oauth2 --app my-app
If you omit --app, the token is saved to the current default app. You can also run xurl auth default my-app first and then use xurl auth oauth2.
Headless / remote machines. The default flow opens a browser and waits for a callback on localhost, which isn't reachable from a remote server. On those hosts use --headless:
xurl auth oauth2 --app my-app --headless
xurl prints the authorization URL; open it on any device with a browser, approve, then paste the resulting redirect URL (or just the code value from the address bar) back into the prompt. No callback listener is needed — the page failing to load is expected; the code is in the URL.
If X returns a client-forbidden / client-not-enrolled error even though auth completed successfully, check the app’s package and environment in the X developer console. On current X platform setup, the working fix was:
- Go to
Apps->Manage apps - Open the app
- Use
Move to package - Choose
Pay-per-use - Move the app to the
Productionenvironment
Without that enrollment step, xurl whoami and other /2/* reads can fail even when the OAuth callback and tokens are valid.
If X does not return your username reliably through /2/users/me, authenticate with an explicit handle instead:
xurl auth oauth2 --app my-app YOUR_USERNAME
That keeps the OAuth2 token associated with the expected username and also gives shortcut commands a fallback when /2/users/me is unavailable.
App-only authentication (Bearer Token):
xurl auth app-only BEARER_TOKEN
cat token.txt | xurl auth app-only -          # read from stdin (keeps it out of shell history)
This stores X's app-only Bearer Token (from the developer portal), used at request time with --auth app. It's named for the auth mode (app-only) rather than the token scheme (bearer), since OAuth2 user tokens are also sent as Authorization: Bearer.
Back-compat:
xurl auth appandxurl auth bearerstill work as aliases, and--bearer-token TOKENis still accepted.
OAuth 1.0a authentication:
xurl auth oauth1 --consumer-key KEY --consumer-secret SECRET --access-token TOKEN --token-secret SECRET
Multi-App Management
List registered apps:
xurl auth apps list
Update credentials on an existing app:
xurl auth apps update my-app --client-id NEW_ID --client-secret NEW_SECRET
xurl auth apps update my-app --redirect-uri http://localhost:8080/callback
REDIRECT_URI from the environment still overrides the stored app value at runtime, so auth apps update --redirect-uri is best for your default per-app callback while env vars remain the temporary override path.
View the effective and stored redirect URI for an app:
xurl auth apps redirect-uri get my-app
Set the stored redirect URI for an app:
xurl auth apps redirect-uri set my-app http://localhost:8080/callback
Remove an app:
xurl auth apps remove old-app
Set the default app and user — interactive picker (uses Bubble Tea):
xurl auth default
Set the default app and user — single command:
xurl auth default my-app              # set default app
xurl auth default my-app alice        # set default app + default user
Use a specific app for a single request:
xurl --app dev-app /2/users/me
Authentication Status
View authentication status across all apps:
xurl auth status
This output shows the effective redirect URI for each app and, when REDIRECT_URI is set in the environment, also shows the stored app value separately so precedence is visible.
Example output:
▸ my-app  [client_id: VUttdG9P…]
      redirect_uri: http://localhost:8080/callback  [app config]
    ▸ oauth2: alice
      oauth2: bob
      oauth1: ✓
      bearer: ✓

  dev-app  [client_id: OTHER789…]
      redirect_uri: http://localhost:8080/callback  [built-in default]
      oauth2: (none)
      oauth1: –
      bearer: –
X Platform Enrollment Troubleshooting
If OAuth succeeds but reads like xurl whoami fail with an error body containing client-forbidden or client-not-enrolled, the current X platform fix is to move the app into the Pay-per-use package and use the Production environment in the developer console. This is an X platform enrollment issue, not a local callback-listener issue in xurl.
▸ on the left = default app. ▸ next to a user = default user.
Clear Authentication
xurl auth clear --all                       # Clear all tokens
xurl auth clear --oauth1                    # Clear OAuth 1.0a tokens
xurl auth clear --oauth2-username USERNAME  # Clear specific OAuth 2.0 token
xurl auth clear --bearer                    # Clear bearer token
Making Requests
Basic GET request:
xurl /2/users/me
Custom HTTP method:
xurl -X POST /2/tweets -d '{"text":"Hello world!"}'
Add headers:
xurl -H "Content-Type: application/json" /2/tweets
Specify authentication type:
xurl --auth oauth2 /2/users/me
xurl --auth oauth1 /2/tweets
xurl --auth app /2/users/me
Use specific OAuth 2.0 account:
xurl --username johndoe /2/users/me
Streaming Responses
Streaming endpoints (like /2/tweets/search/stream) are automatically detected and handled appropriately. The tool will automatically stream the response for these endpoints:
/2/tweets/search/stream/2/tweets/sample/stream/2/tweets/sample10/stream/2/tweets/firehose/stream/lang/en/2/tweets/firehose/stream/lang/ja/2/tweets/firehose/stream/lang/ko/2/tweets/firehose/stream/lang/pt
For example:
xurl /2/tweets/search/stream
You can also force streaming mode for any endpoint using the --stream or -s flag:
xurl -s /2/users/me
Printing an Access Token
xurl token prints a valid OAuth2 access token for the active app to stdout (a single line, no decoration). If the stored token has expired it is refreshed and persisted first. This command never opens a browser, so it is safe to use in scripts:
xurl token                 # token for the default app/user
xurl token --app my-app    # token for a specific app
xurl token -u alice        # token for a specific OAuth2 user
TOKEN=$(xurl token) && curl -H "Authorization: Bearer $TOKEN" https://api.x.com/2/users/me
If no token is available (and none can be refreshed), it exits non-zero with a hint to run xurl auth oauth2.
MCP Server (xurl mcp)
xurl mcp turns xurl into a Model Context Protocol bridge for the hosted X API MCP server. It reads newline-delimited JSON-RPC from stdin, relays each message to a remote Streamable HTTP MCP endpoint with an Authorization: Bearer <token> header, and writes the server's responses (plain JSON or text/event-stream) back to stdout as newline-delimited JSON. The MCP session id is maintained automatically and the token is refreshed in-process as it expires.
Because X's OAuth requires your own app (there is no dynamic client registration), xurl holds the app identity and mints/refreshes the token. On first run with no cached token, the bridge opens the browser for a one-time OAuth2 login using the CLIENT_ID/CLIENT_SECRET from its environment, then caches and auto-refreshes the token for subsequent runs. The MCP handshake is held until that login completes, so give the server a generous startup_timeout_sec.
Use it directly from any MCP client (Claude Desktop, Cursor, etc.) with a standard MCP server config — no separate install step is needed thanks to the npm launcher:
{
  "mcpServers": {
    "xapi": {
      "command": "npx",
      "args": ["-y", "@xdevplatform/xurl", "mcp", "https://api.x.com/mcp"],
      "env": { "CLIENT_ID": "...", "CLIENT_SECRET": "..." },
      "startup_timeout_sec": 300
    }
  }
}
Requirements for the first-run browser login: a browser on the machine running the client, and your X app must have the OAuth2 redirect URI http://localhost:8080/callback registered (or set REDIRECT_URI to one that is). On a headless host with no reachable browser, authenticate out-of-band first with xurl auth oauth2 --headless (the bridge then just reuses the cached token).
The <url> positional is optional and defaults to https://api.x.com/mcp. --app is honored, so you can point a client at a specific registered app:
xurl --app my-app mcp                       # bridge the default endpoint using my-app
xurl mcp https://api.x.com/mcp              # explicit endpoint
All diagnostics are written to stderr so stdout stays a clean JSON-RPC channel.
Temporary Webhook Setup
xurl can help you quickly set up a temporary webhook URL to receive events from the X API. This is useful for development and testing.
-
Start the local webhook server with ngrok:
Run the
webhook startcommand. This will start a local server and use ngrok to create a public URL that forwards to your local server. You will be prompted for your ngrok authtoken if it's not already configured via theNGROK_AUTHTOKENenvironment variable.xurl webhook start # Or with a specific port and output file for POST bodies xurl webhook start -p 8081 -o webhook_events.logThe command will output an ngrok URL (e.g.,
https://your-unique-id.ngrok-free.app/webhook). Note this URL. -
Register the webhook with the X API:
Use the ngrok URL obtained in the previous step to register your webhook. You'll typically use app authentication for this.
# Replace https://your-ngrok-url.ngrok-free.app/webhook with the actual URL from the previous step
xurl --auth app /2/webhooks -d '{"url": "<your ngrok url>"}' -X POST
Your local
xurl webhook startserver will then handle the CRC handshake from Twitter and log incoming POST events (and write them to a file if-owas used).
Media Upload
The tool supports uploading media files to the X API using the chunked upload process.
Upload a media file (the media type and category are auto-detected from the file extension):
xurl media upload path/to/file.mp4
xurl media upload path/to/photo.jpg
Override the auto-detected media type and category when needed:
xurl media upload --media-type image/jpeg --category tweet_image path/to/image.jpg
Check media upload status:
xurl media status MEDIA_ID
Wait for media processing to complete:
xurl media status --wait MEDIA_ID
Direct Media Upload
Most users should just use xurl media upload above. If you need to drive the
chunked upload manually, use the -F flag with the path-style endpoints that
xurl media upload itself uses:
- First, initialize the upload:
xurl -X POST /2/media/upload/initialize -d '{"total_bytes": FILE_SIZE, "media_type": "video/mp4", "media_category": "tweet_video"}'
- Then, append the media chunks (repeat with an increasing
segment_index):
xurl -X POST -F path/to/file.mp4 /2/media/upload/MEDIA_ID/append
- Finally, finalize the upload:
xurl -X POST /2/media/upload/MEDIA_ID/finalize
- Check the status:
xurl '/2/media/upload?command=STATUS&media_id=MEDIA_ID'
Encrypted Chat (xurl chat)
xurl chat is a full end-to-end encrypted XChat client. Encryption and
decryption happen locally using the official chat-xdk
crypto library; the server only ever sees ciphertext.
Keys must already exist. xurl never generates or registers encryption keys — the
account needs XChat keys from another client (e.g. the X app). Bring them to this
machine once (needs an OAuth2 login with the dm.read + dm.write scopes):
xurl chat keys restore              # recover from Juicebox with your PIN, or
xurl chat keys import               # paste a private-key blob exported elsewhere
xurl chat keys status               # local + registered key state and fingerprint
Conversations are addressed by @username, user id, or conversation id (123-456, g123):
xurl chat conversations                            # list your inbox
xurl chat read @bob [-n 50] [--json]               # decrypted history (auto marks read)
xurl chat listen @bob                              # live tail (Ctrl-C to stop)
xurl chat send @bob "hello"                        # send (new 1:1 keys itself)
xurl chat send @bob "look" --file photo.png        # attach an encrypted file
xurl chat send @bob "ok" --reply-to SEQUENCE_ID    # threaded reply (id from read --json)
xurl chat download @bob MEDIA_HASH_KEY -o out.png  # download + decrypt an attachment
xurl chat rotate @bob                              # rotate the conversation key
xurl chat add-members g123 @carol                  # add a group member (rotates the key)
xurl chat mark-read @bob                           # (also automatic on read/listen/send)
xurl chat typing @bob                              # (also automatic before send)
read, listen, and send mark the conversation read automatically, and send sends a
typing indicator first; suppress with --no-mark-read / --no-typing. rotate and
add-members change the key for every participant and protect future messages only —
old history stays readable only to holders of the earlier key versions.
Notes:
- Keys not already registered on the account are rejected on restore/import; xurl never writes to Juicebox or the key-registration endpoint.
- Private keys live in
~/.xurl/keys.yml(mode 600). Losing it is safe as long as the Juicebox backup (made by the original client) still exists. chatis supported on macOS (Intel/Apple Silicon) and Linux (amd64), and the release binaries (Homebrew, npm, GitHub releases) include it on those platforms. On other platforms (Windows, Linux arm64/i386)xurl chatprints a stub explaining it is unavailable. Source builds on supported platforms need cgo:CGO_ENABLED=1 go install github.com/xdevplatform/xurl@latest.
Token Storage
~/.xurl is a directory: tokens and app credentials live in ~/.xurl/auth.yml, and XChat private keys live in ~/.xurl/keys.yml. Each registered app has its own isolated set of tokens. Example auth.yml:
apps:
  my-app:
    client_id: abc123
    client_secret: secret456
    redirect_uri: http://localhost:8080/callback
    default_user: alice
    oauth2_tokens:
      alice:
        type: oauth2
        oauth2:
          access_token: "..."
          refresh_token: "..."
          expiration_time: 1234567890
    bearer_token:
      type: bearer
      bearer: "AAAA..."
default_app: my-app
Migration: A single-file
~/.xurlfrom a previous version migrates automatically to~/.xurl/auth.ymlon first use (pre-v1.0 JSON-format files are also converted to the YAML multi-app format, preserving tokens in adefaultapp).
Contributing
Contributions are welcome!
License
This project is open-sourced under the MIT License - see the LICENSE file for details.
相关资源

Postiz
MCP开源社媒排期平台 Postiz 自带的 MCP:agent 能在 X、LinkedIn、Instagram、YouTube 等 30 多个平台起草、排期、发布帖子并查看数据。云端版用浏览器 OAuth 登录、无需 API Key(7 天试用后付费),也可自托管免费使用。
gitroomhq/postiz-app41.2k
Streamlink
CLI把 Twitch、YouTube、B 站、抖音、虎牙、斗鱼等平台的直播流交给本地播放器观看,或用 --output / --record 直接保存成视频文件,便于留存自家或合作方的直播回放、做二次剪辑。macOS 可用 Homebrew 安装,观看需另装 VLC 等播放器;请只录制有权使用的内容。
streamlink/streamlink11.9k
Easel
CLI浙大、北大实验室开源的社媒运营助手,基于 OpenClaw,含 113 个技能,覆盖热点发现、选题排期、图文与视频创作、发布到小红书/抖音/B 站/公众号等七个平台和数据复盘;easel skill 命令可单独调用某个技能,另有 Web 工作台。需 Python 3.10+、Node.js 22.19+、FFmpeg 和大模型 API Key,发布要登录平台账号;小红书自动发布有风控风险,建议人工确认后再发。
ZJU-REAL/Easel4.5k
X导师.skill(x-mentor-skill)
SkillX(Twitter)运营导师:整合 6 位头部创作者的方法论和 X 开源推荐算法,帮你选题、写推文和长帖(给出多个开头版本)、审阅草稿、规划涨粉策略,还能根据近期推文数据生成账号诊断报告(可用浏览器工具采集或手动提供)。中文交互,装好 agent 即可用。
alchaincyf/x-mentor-skill1.3k
capcut-cli
CLI在终端里创建和修改剪映 / CapCut 本地草稿,可按静音粗剪、加带样式字幕、生成多语种版本,结果仍能在剪映里逐轨精修,适合课程和自媒体视频。需要 Node 18+ 与桌面版剪映或 CapCut,字幕需 Whisper,翻译需 Anthropic API Key;剪映 6.0 起的加密草稿读不了。非字节官方项目。
renezander030/capcut-cli1.1k
X Article Publisher
Skill把写好的 Markdown 长文一键排进 X(Twitter)Articles 编辑器:自动处理标题、加粗、链接、封面和正文配图位置,表格与 Mermaid 图转成图片,只保存草稿、不会自动发布。需要 X Premium Plus 账号、Playwright MCP 和 Python(macOS / Windows)。
wshuyi/x-article-publisher-skill874