
joinly
MCP开源会议接入工具:让 agent 以参会者身份加入 Zoom、Teams、Google Meet,读取实时转写、聊天记录和参会人,也能发言,可用来整理会议纪要。需在本机用 Docker 运行服务(镜像约 2.3GB),转写默认在本地完成。




Make your meetings accessible to AI Agents 🤖
joinly.ai is a connector middleware designed to enable AI agents to join and actively participate in video calls. Through its MCP server, joinly.ai provides essential meeting tools and resources that can equip any AI agent with the skills to perform tasks and interact with you in real time during your meetings.
Want to dive right in? Jump to the Quickstart! Want to know more? Visit our website!
[!IMPORTANT]
Don't want the hustle of setting everything up? Try our cloud first! ☁️🚀
:sparkles: Features
- Live Interaction: Lets your agents execute tasks and respond in real-time by voice or chat within your meetings
- Conversational flow: Built-in logic that ensures natural conversations by handling interruptions and multi-speaker interactions
- Cross-platform: Join Google Meet, Zoom, and Microsoft Teams (or any available over the browser)
- Bring-your-own-LLM: Works with all LLM providers (also locally with Ollama)
- Choose-your-preferred-TTS/STT: Modular design supports multiple services - Whisper/Deepgram for STT and Kokoro/ElevenLabs/Deepgram for TTS (and more to come...)
- 100% open-source, self-hosted and privacy-first :rocket:
:video_camera: Demos
GitHub

In this demo video, joinly answers the question 'What is Joinly?' by accessing the latest news from the web. It then creates an issue in a GitHub demo repository.
Notion
In this demo video, we connect joinly to our notion via MCP and let it edit the content of a page content live in the meeting.
Any ideas what we should build next? Write us! :rocket:
:zap: Quickstart
Run joinly via Docker with a basic conversational agent client.
[!IMPORTANT] Prerequisites: Docker installation
Create a new folder joinly or clone this repository (not mandatory for the following steps). In this directory, create a new .env file with a valid API key for the LLM provider you want to use, e.g. OpenAI:
[!TIP] You can find the OpenAI API key here
# .env
# for OpenAI LLM
# change key and model to your desired one
JOINLY_LLM_MODEL=gpt-4o
JOINLY_LLM_PROVIDER=openai
OPENAI_API_KEY=your-openai-api-key
[!NOTE] See .env.example for complete configuration options including Anthropic (Claude) and Ollama setups. Replace the placeholder values with your actual API keys and adjust the model name as needed. Delete the placeholder values of the providers you don't use.
Pull the Docker image (~2.3GB since it packages browser and models):
docker pull ghcr.io/joinly-ai/joinly:latest
Launch your meeting in Zoom, Google Meet or Teams and let joinly join the meeting using the meeting link as <MeetingURL>. Then, run the following command from the folder where you created the .env file:
docker run --env-file .env ghcr.io/joinly-ai/joinly:latest --client <MeetingURL>
:red_circle: Having trouble getting started? Let's figure it out together on our discord!
:technologist: Run a custom client
In Quickstart, we ran the Docker Container directly as a client using --client. But we can also run it as a server and connect to it from outside the container, which allows us to connect other MCP servers. Here, we run a custom client using the joinly-client package and connect it to the joinly MCP server.
[!IMPORTANT] Prerequisites: do the Quickstart (except the last command), install uv, and open two terminals
Start the joinly server in the first terminal (note, we are not using --client here and publish port 8000 on localhost only):
docker run -p 127.0.0.1:8000:8000 ghcr.io/joinly-ai/joinly:latest
[!WARNING] The joinly MCP server has no authentication and accepts client-supplied configuration, so it is meant to run locally with a single trusted client. Bind it to
localhost(as above) and do not expose the port to a network.
While the server is running, start the example client implementation in the second terminal window to connect to it and join a meeting:
uvx joinly-client --env-file .env <MeetingUrl>
Add MCP servers to the client
Add the tools of any MCP server to the agent by providing a JSON configuration. The configuration file can contain multiple entries under "mcpServers" which will all be available as tools in the meeting (see fastmcp client docs for config syntax):
{
    "mcpServers": {
        "localServer": {
            "command": "npx",
            "args": ["-y", "package@0.1.0"]
        },
        "remoteServer": {
            "url": "http://mcp.example.com",
            "auth": "oauth"
        }
    }
}
Add for example a Tavily config for web searching, then run the client using the config file, here named config.json:
uvx joinly-client --env-file .env --mcp-config config.json <MeetingUrl>
:wrench: Configurations
Configurations can be given via env variables and/or command line args. Here is a list of common configuration options, which can be used when starting the docker container:
docker run --env-file .env -p 127.0.0.1:8000:8000 ghcr.io/joinly-ai/joinly:latest <MyOptionArgs>
Alternatively, you can pass --name, --lang, and provider settings as command line arguments using joinly-client, which will override settings of the server:
uvx joinly-client <MyOptionArgs> <MeetingUrl>
Basic Settings
In general, the docker image provides an MCP server which is started by default. But to quickly get started, we also include a client implementation that can be used via --client. Note, in this case no server is started and no other client can connect to it.
# Start directly as client; default is as server, to which a custom client can connect
--client <MeetingUrl>

# Change participant name (default: joinly)
--name "AI Assistant"

# Change language of TTS/STT (default: en)
# Note, availability depends on the TTS/STT provider
--lang de

# Change host & port of the joinly MCP server
--host 0.0.0.0 --port 8000
Providers
Text-to-Speech
# Kokoro (local) TTS (default)
--tts kokoro
--tts-arg voice=<VoiceName>  # optionally, set different voice

# ElevenLabs TTS, include ELEVENLABS_API_KEY in .env
--tts elevenlabs
--tts-arg voice_id=<VoiceID>  # optionally, set different voice

# Deepgram TTS, include DEEPGRAM_API_KEY in .env
--tts deepgram
--tts-arg model_name=<ModelName>  # optionally, set different model (voice)
Transcription
# Whisper (local) STT (default)
--stt whisper
--stt-arg model_name=<ModelName>  # optionally, set different model (default: base), for GPU support see below

# Deepgram STT, include DEEPGRAM_API_KEY in .env
--stt deepgram
--stt-arg model_name=<ModelName>  # optionally, set different model
Debugging
# Start browser with a VNC server for debugging;
# forward the port and connect to it using a VNC client
--vnc-server --vnc-server-port 5900

# Logging
-v  # or -vv, -vvv

# Help
--help
GPU Support
We provide a Docker image with CUDA GPU support for running the transcription and TTS models on a GPU. To use it, you need to have the NVIDIA Container Toolkit installed and CUDA >= 12.6. Then pull the CUDA-enabled image:
docker pull ghcr.io/joinly-ai/joinly:latest-cuda
Run as client or server with the same commands as above, but use the joinly:{version}-cuda image and set --gpus all:
# Run as server
docker run --gpus all --env-file .env -p 8000:8000 ghcr.io/joinly-ai/joinly:latest-cuda -v
# Run as client
docker run --gpus all --env-file .env ghcr.io/joinly-ai/joinly:latest-cuda -v --client <MeetingURL>
By default, the joinly image uses the Whisper model base for transcription, since it still runs reasonably fast on CPU. For cuda, it automatically defaults to distil-large-v3 for significantly better transcription quality. You can change the model by setting --stt-arg model_name=<model_name> (e.g., --stt-arg model_name=large-v3). However, only the respective default models are packaged in the docker image, so it will start to download the model weights on container start.
:test_tube: Create your own agent
You can also write your own agent and connect it to our joinly MCP server. See the code examples for the joinly-client package or the client_example.py if you want a starting point that doesn't depend on our framework.
The joinly MCP server provides following tools and resources:
Tools
join_meeting- Join meeting with URL, participant name, and optional passcodeleave_meeting- Leave the current meetingspeak_text- Speak text using TTS (requirestextparameter)send_chat_message- Send chat message (requiresmessageparameter)mute_yourself- Mute microphoneunmute_yourself- Unmute microphoneget_chat_history- Get current meeting chat history in JSON formatget_participants- Get current meeting participants in JSON formatget_transcript- Get current meeting transcript in JSON format, optionally filtered by minutesget_video_snapshot- Get an image from the current meeting, e.g., view a current screenshare
Resources
transcript://live- Live meeting transcript in JSON format, including timestamps and speaker information. Subscribable for real-time updates when new utterances are added.
:building_construction: Developing joinly.ai
For development we recommend using the development container, which installs all necessary dependencies. To get started, install the DevContainer Extension for Visual Studio Code, open the repository and choose Reopen in Container.
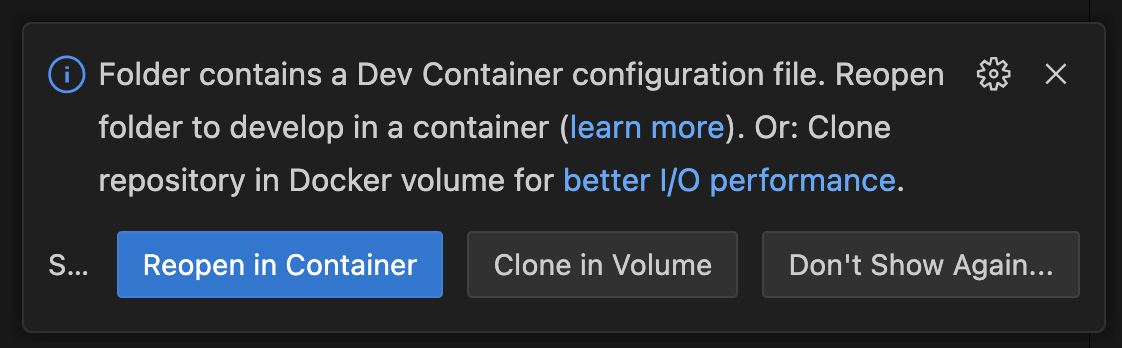
The installation can take some time, since it downloads all packages as well as models for Whisper/Kokoro and the Chromium browser. At the end, it automatically invokes the download_assets.py script. If you see errors like Missing kokoro-v1.0.onnx, run this script manually using:
uv run scripts/download_assets.py
We'd love to see what you are using it for or building with it. Showcase your work on our discord
:pencil2: Roadmap
Meeting
- Meeting chat access
- Camera in video call with status updates
- Enable screen share during video conferences
- Participant metadata and joining/leaving
- Improve browser agent capabilities
Conversation
- Speaker attribute for transcription
- Improve client memory: reduce token usage, allow persistence across meetings events
- Improve End-of-Utterance/turn-taking detection
- Human approval mechanism from inside the meeting
Integrations
- Showcase how to add agents using the A2A protocol
- Add more provider integrations (STT, TTS)
- Integrate meeting platform SDKs
- Add alternative open-source meeting provider
- Add support for Speech2Speech models
:busts_in_silhouette: Contributing
Contributions are always welcome! Feel free to open issues for bugs or submit a feature request. We'll do our best to review all contributions promptly and help merge your changes.
Please check our Roadmap and don't hesitate to reach out to us!
:memo: License
This project is licensed under the MIT License ‒ see the LICENSE file for details.
:speech_balloon: Getting help
If you have questions or feedback, or if you would like to chat with the maintainers or other community members, please use the following links:
相关资源

Vexa
MCP开源会议机器人与实时转写平台:派 bot 加入 Google Meet、Teams、Zoom 会议并按发言人实时转写,通过 MCP 让 agent 发起机器人、读取转写;可用托管服务(需 API Key)或自托管。
Vexa-ai/vexa3k
Anarlog
Skill开源本地优先会议记录应用 Anarlog(原 Hyprnote)的官方技能:让 agent 查询会议笔记、摘要、逐字稿、参会人和行动项,默认读取本机数据,不需要会议机器人入会;需先安装 Anarlog 桌面端及其命令行工具,远程读取云端数据要 Pro 订阅。
fastrepl/anarlog9.9k
Screenpipe MCP Server
MCP在本机持续记录屏幕与音频,提取界面文字并做语音转写,agent 可以检索你看过的网页、文档和开过的会,按时间汇总当天工作与对话,录制数据默认存在本机。需先安装并运行 screenpipe:源码版限个人非商业免费使用,桌面版按月订阅。
screenpipe/screenpipe22.4k
Microsoft Teams
PluginOpenAI 官方 Codex 插件:通过 Teams 连接器汇总群聊与频道消息、提取待办,并起草频道回复或会后跟进,适合用 Teams 办公或上课的行政人员与老师。需用 ChatGPT 账号登录 Codex 并授权 Microsoft 账号。
openai/plugins7.9k
dingtalk-minutes
Skill钉钉官方 dws CLI 自带技能:让 agent 按标题或时间找到钉钉 AI 听记,读取摘要、逐字稿、关键词和行动项,上传录音生成听记,也能改标题、覆盖纪要或整份导出到本地;需安装 dws CLI 登录钉钉,并经企业管理员授权后使用。
DingTalk-Real-AI/dingtalk-workspace-cli4k
FunASR MCP Server
MCPFunASR 项目官方 MCP:用 SenseVoice 模型在本地把音频文件转写成文字,支持普通话、粤语、英语、日语、韩语,可附分段时间戳。本地推理无需 API Key,音频不出本机,提供 Docker 镜像。
modelscope/FunASR21k